
14
Mar
Abstract
When modelling non-GSO satellite systems, the geometry is always changing, and so it becomes necessary to consider the method by which the active satellite is selected. In Visualyse Professional, this is done via the Tracking Strategy object, which is used by a Dynamic Link to select an end station based upon rules such as highest elevation. The Tracking Strategy can be used to make sure the “right” non-GSO satellite is active at each time step taking into account factors such as minimum elevation angle and exclusion zones around the GSO arc. This updated Technical Note (TN) describes the Tracking Strategies in Visualyse Professional and describes some of the most common selection methods.
Introduction To Tracking Strategies
For non-GSO satellite constellations, there can be multiple satellites visible to an Earth Station (ES) that it could communicate with. The question is then, which one should the ES select at each moment in time, or in a Visualyse Professional simulation, for each time step? This is done by defining a “Tracking Strategy” which is a set of rules that can be used to identify which satellite to select from a constellation.
The basic Tracking Strategy has two stages:
- Filtering: from those satellites that are visible to the Earth Station, use a filter to identify which are possible candidates to be used at this time step and which are not suitable. For example, those satellites which are below a minimum elevation angle or close to the GSO arc might not be suitable and should not be considered further.
- Selection: from those satellites which are possible candidates, select the preferred one to use at this time step. For example, it could be the satellite which has the highest elevation angle at the ES or is the nearest.
The basic Tracking Strategy can be extended by an initial stage that considers whether the satellite selected at the previous time step is still suitable in order to support “continue to track” or “longest hold time” satellite selection methods.
Note that while these examples consider an ES selecting a satellite from a constellation, the Tracking Strategy is a generic Station selection tool, and so it could also be used:
- To connect to a single non-GSO satellite including rules such as minimum elevation angle, as in the first example below
- By a non-GSO satellite to select the nearest gateway to communicate with
- By a GSO satellite to select a non-GSO satellite to communicate with, such as for an inter-satellite link (ISL), as in the example below
- By a 5G network’s user terminal (UT) to select a base station (BS).
There is also the option in Visualyse Professional to have a Link start at the end Station of another Link, allowing end-to-end communication over multiple Links.
This TN is an updated document for March 2024 that includes two new sections, as identified below.
Example Tracking Strategies
This section describes how to configure the following satellite selection methods:
- Set a Minimum Elevation Angle
- Set a Minimum Elevation Angle and GSO Arc Avoidance Angle
- Use Highest Elevation vs. Random Satellite Selection
- Include a Constellation Avoid Selection Method
- Advanced Constellation Avoid Selection Methods (New)
- Select Longest Track Option
- Configuring a gateway with many antennas
- Model Inter-satellite Links
- Derive Visibility Statistics
- Constellation Avoid with Diversity (New)
In addition, tracking strategies and a traffic object parameter can be combined to provide diversity when the first choice of link is not available (new).
Set a Minimum Elevation Angle
While Tracking Strategies are often used with constellations containing many non-GSO satellites, they can also be used for satellite systems with the single satellite. One reason for using Tracking Strategies in these cases is if there are (say) minimum elevation angle constraints associated with the ES.
Consider a scenario with:
- Single non-GSO satellite in sun-synchronous orbit, providing remote sensing data
- Single ES, communicating with the satellite only when it is above 5° elevation angle.
This scenario can be modelled by putting the single non-GSO satellite in a station group, similar to this:
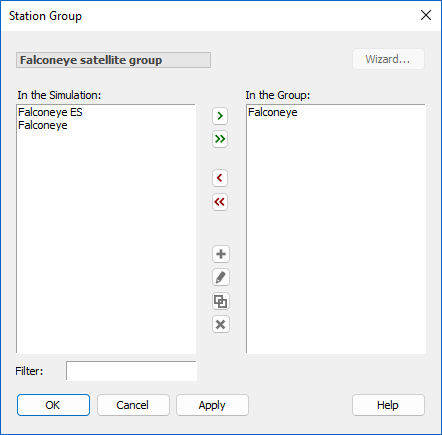
Then the minimum elevation angle of 5° constraint can be coded into the Tracking Strategy as follows:
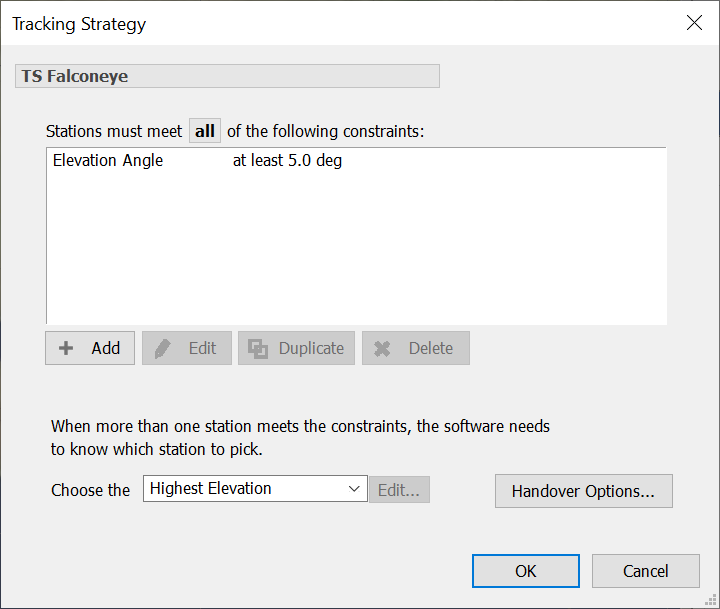
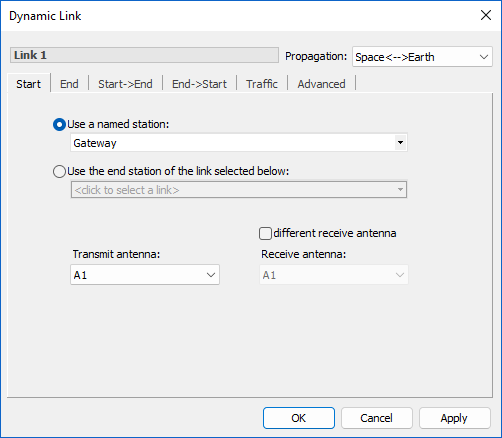
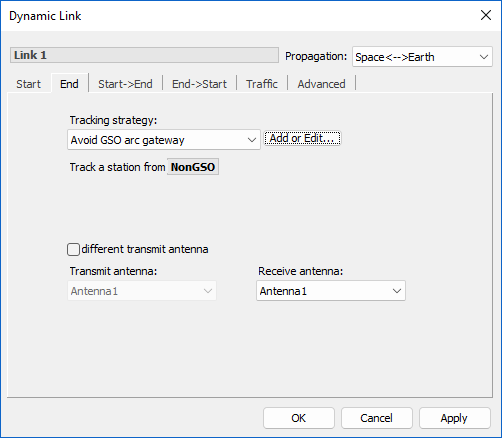
The non-GSO satellite Station Group and Tracking Strategy can then be used in the end Station selection of a Dynamic Link as follows:
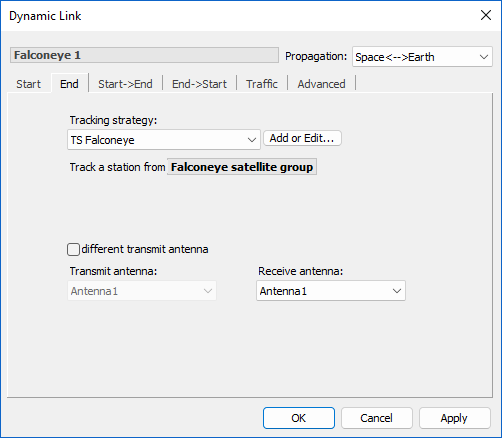
This Link will then only be active when the satellite is at elevation angle of 5 or higher at the ES.
Set a Minimum Elevation Angle and GSO Arc Avoidance Angle
In bands where non-GSO systems share spectrum with GSO systems, one way to reduce interference levels (in either direction, but in particular into GSO systems) is for the non-GSO system to not transmit when the line from the ES to the satellite could go close to the GSO arc. An exclusion zone can be defined around the GSO arc using the = alpha angle, which is the minimum angle from a line to a non-GSO satellite and any point on the visible GSO arc, as in the figure below.

This selection method is available in the Tracking Strategy object and can be combined with other methods, such as a minimum elevation angle. For example, consider a non-GSO constellation with the following constraints:
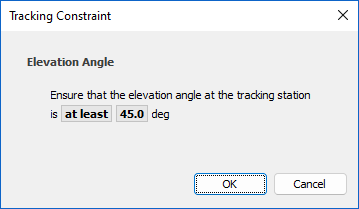
- Elevation of an active satellite must be at least 45°
- Angle to the GSO arc of an active satellite must be at least 8.4°.
A Tracking Strategy comes with an elevation angle constraint, so this can be configured to handle the first constraint:
The second constraint can be included by clicking on  and then selecting “Avoid GSO Arc”:
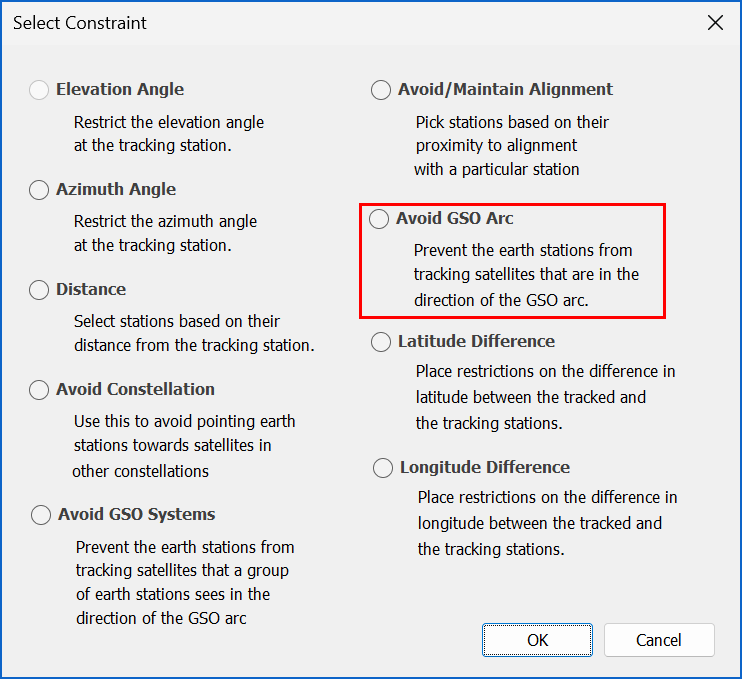
This can then be configured in a similar way to the elevation angle constraint:

The two constraints can then be seen in the list here:

Use Highest Elevation vs. Random Satellite Selection
After filters have identified the possible candidate satellites, the Tracking Strategy’s next task is to select the one to use for this time step. A number of methods could be used, such as highest elevation or random satellite selection, as in the examples below:


These can result in very different statistics. For example, in the figure below the highest elevation satellite above London is nearby and at this latitude there will be a large angle to the GSO arc:

However, if the random method is used, then the selected satellite could be a long way from the ES and potentially closer to being in-line with the GSO arc:

It can be useful to consider how sensitive the simulation results are to the satellite selection method. Factors to consider include:
- Operational behaviour: it might be that the operational system would be more likely to select the satellite directly overhead rather than one far away.
- Identification of worst case: by selecting “random” it is possible to search a wider range of geometries to identify one that could cause harmful interference.
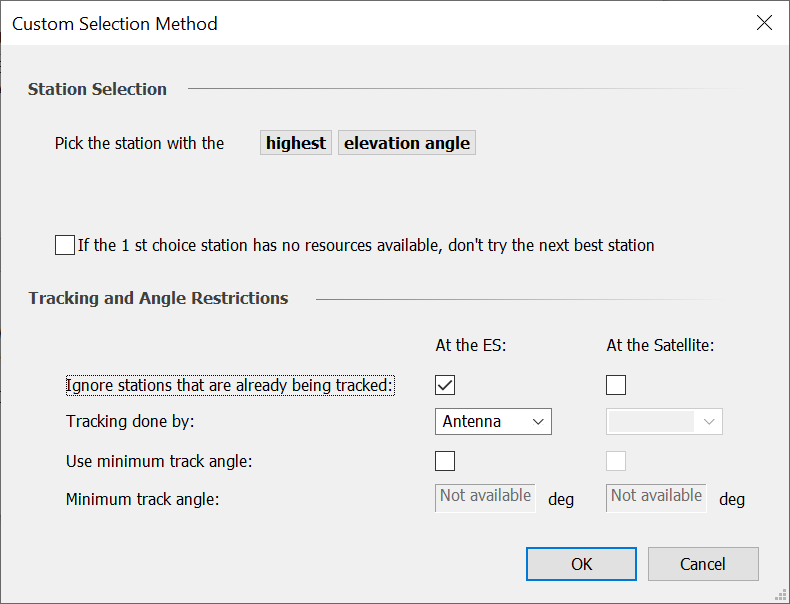
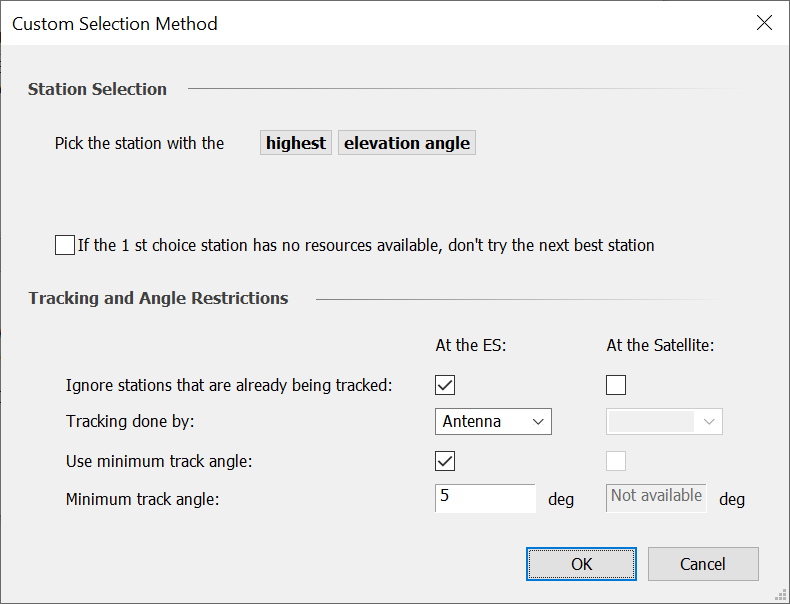
Other more advanced methods can also be considered by selecting “Advanced <click Edit>” which allows additional controls to be used, as in the figure below:
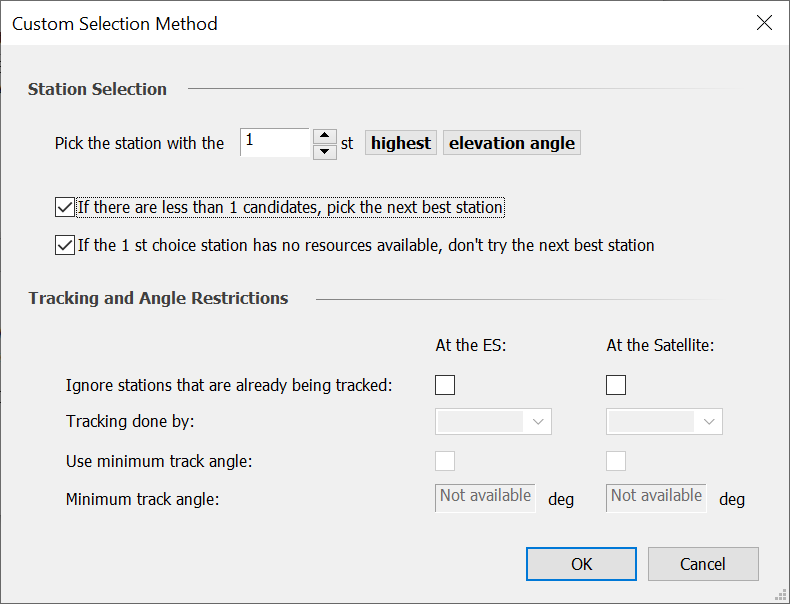
Some of these options can be useful to extend the basic selection methods.
For example, consider the highest elevation satellite selection method when there are multiple ES each with their own Dynamic Link and the non-GSO satellites use steerable Antennas. It could be that at some time steps, multiple ES try to select the same satellite: what happens if more Links try to use a satellite than it has available steerable Antennas?
One of the constraints with Visualyse Professional is that each steerable Antenna can only point in one direction at each time step. Hence if there are (say) 3 Links each trying to use a satellite with (say) 2 Antennas, the last Link will not be able to get an Antenna to point in its direction.
Note that typically in this case the Antenna selection method is “Any tracking antenna”.
A number of possible behaviours could be considered for the third and final Link:
- The Link fails as it is unable to identify a suitable and available Antenna
- The Link uses a different satellite, one that has an available Antenna
- The Link uses another Antenna on the first satellite, even though it will result in degraded performance as there would be a significant reduction in antenna gain at the satellite towards the ES. One way this could be done is by using a named Antenna for multiple links.
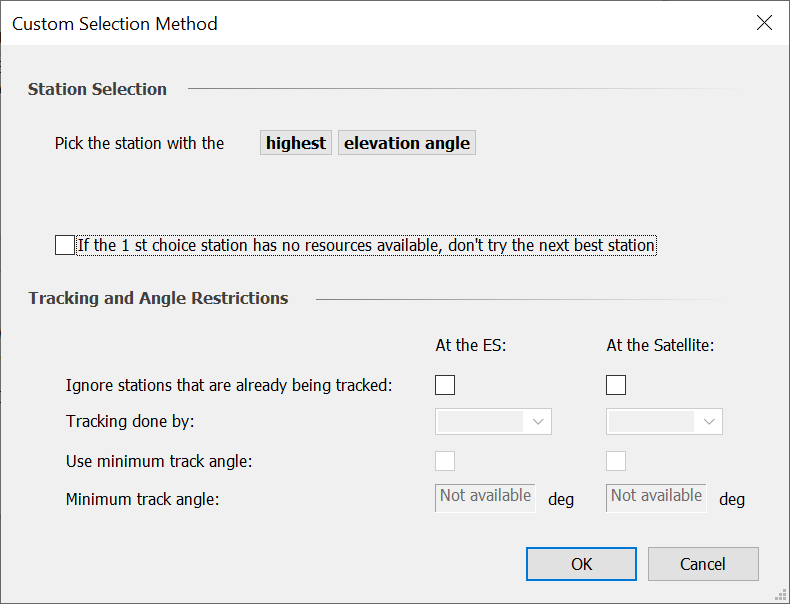
The first two of these options can be selected by checking the “If the 1st choice station has no resources available, don't try the next best station” field.
However, the second of these options can be selected by clearing this field. This tells Visualyse Professional that if the preferred station doesn't have any available tracking Antennas or Beams, then it is ok to select another satellite. In this case, Visualyse Professional will return a list of possible candidate satellites, sorted by one of the metrics such as elevation angle, and work its way down the list:
Include a Constellation Avoid Selection Method
As well as avoiding the GSO arc, it is possible for a non-GSO constellation to avoid pointing towards satellites of another constellation. This can be a useful tool during the satellite coordination process.
This can be included by adding the following constraint to the satellite selection phase:
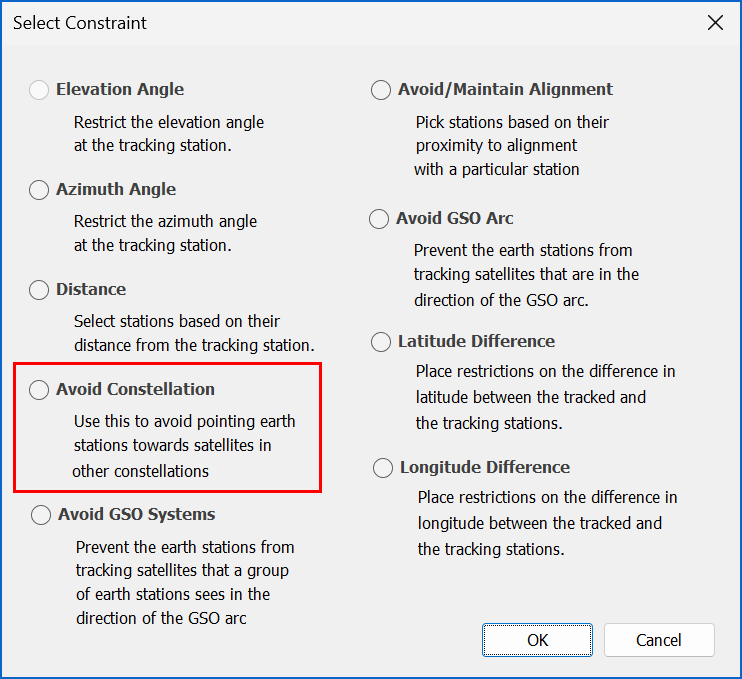
The avoidance angle can be defined either at the ES or at the satellite:

There are additional options that can be used, as discussed further in the next section.
Note that you can have two “Avoid Constellation” constraints, one defined at the ES and the other at the satellite. It is also possible to have “Avoid Constellation” used by the Tracking Strategies of each system to protect the other.
Advanced Constellation Avoid Selection Methods (New)
The avoid constellation is a method to facilitate sharing spectrum between two or more non-GSO constellations. But it can lead to spectrum inefficiencies, as can be seen in the example below:
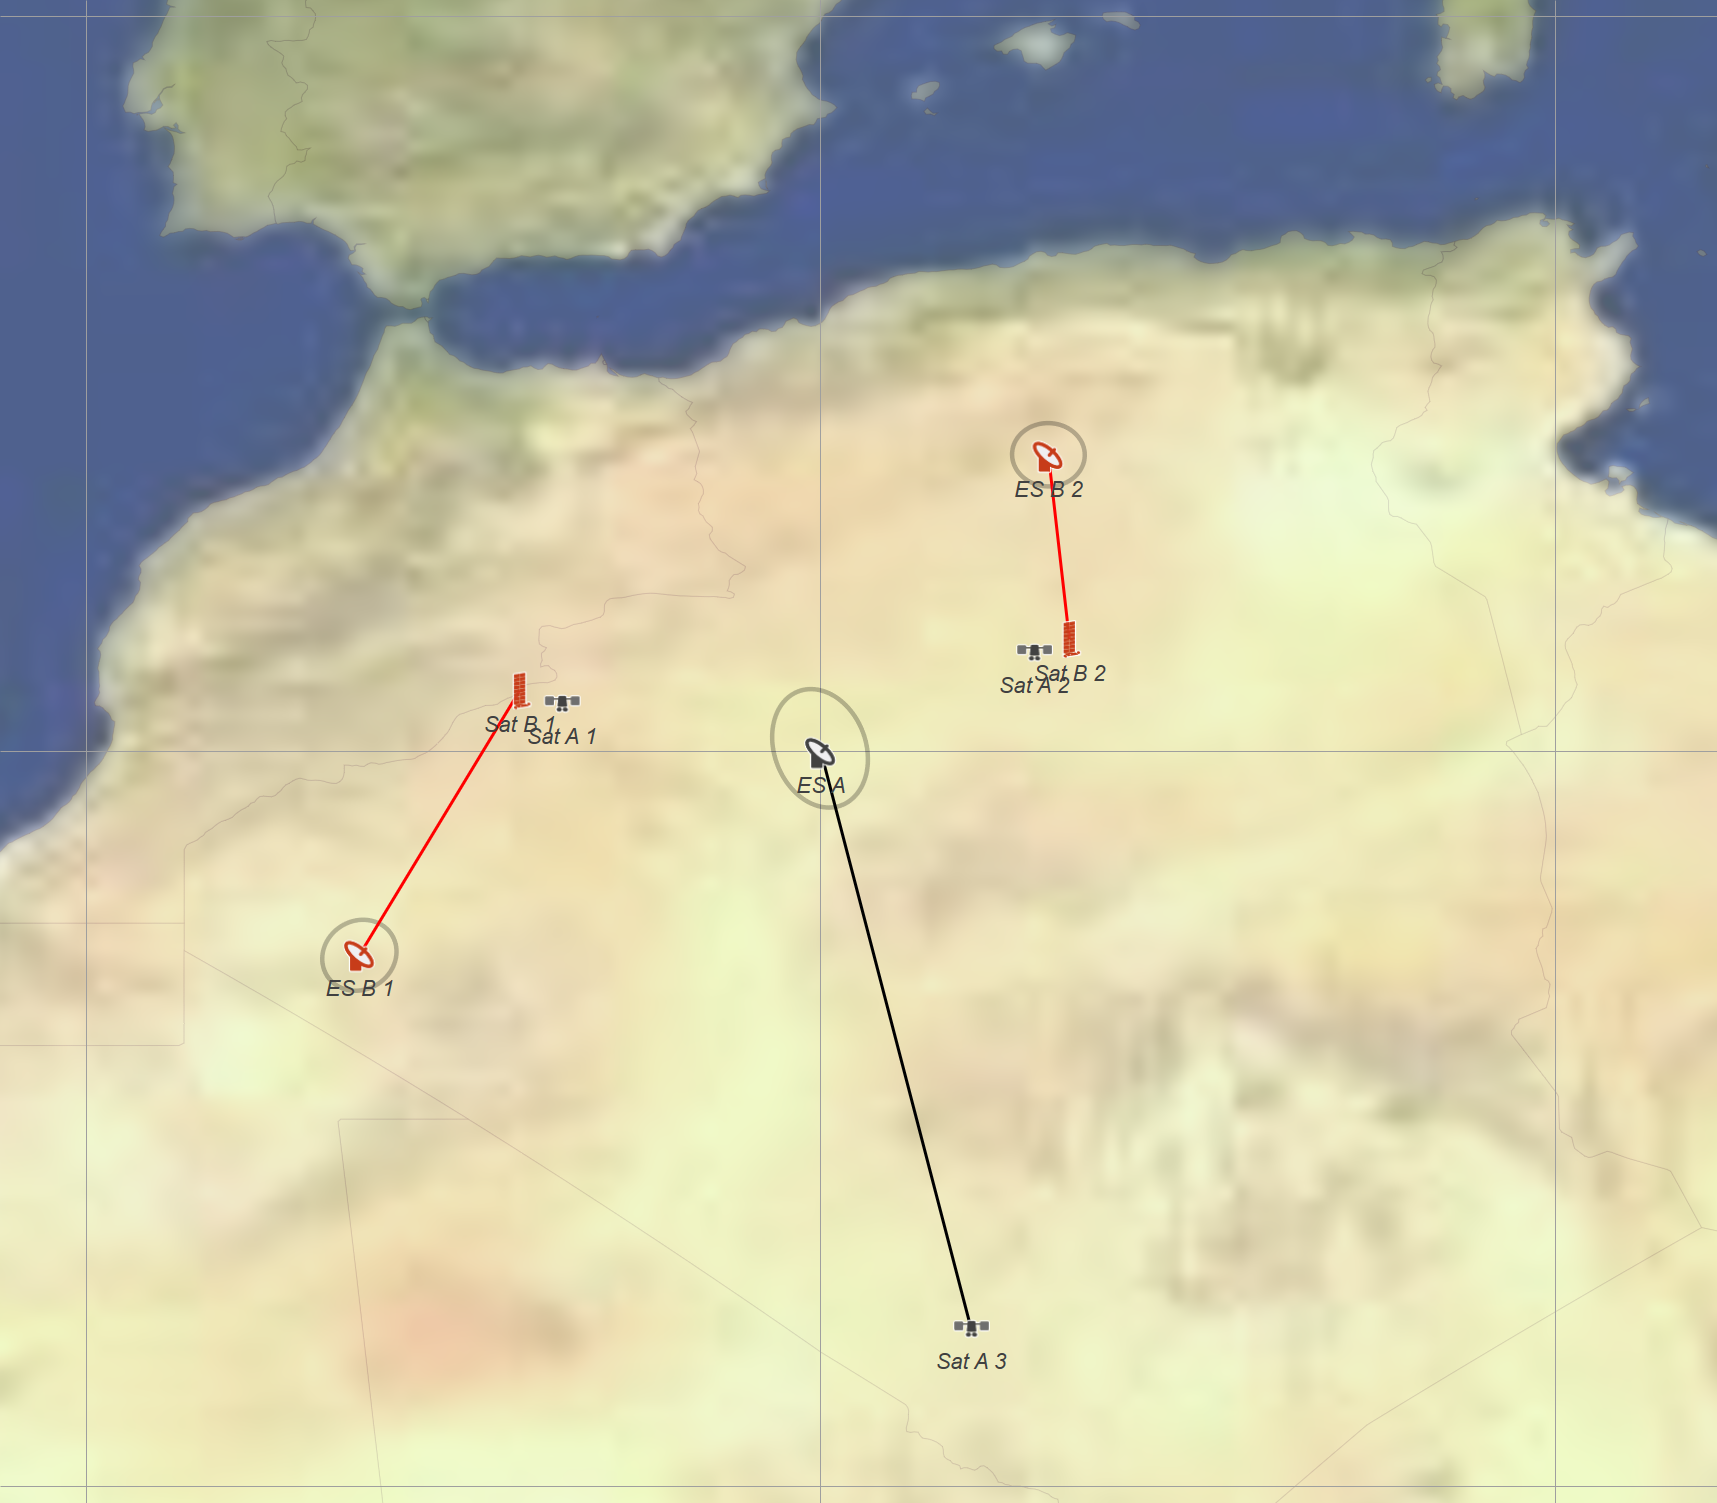
Here ES-A has a choice of three satellites: {A1, A2, A3}, where the first two are “better” choices in that they have a higher elevation angle than satellite A3. But these two satellites are close to satellites {B1, B2} of system B and so an “avoid constellation” tracking strategy rejects them.
But in this case, System B satellites {B1, B2} are serving ES at locations far away from the ES-A, so there would be a large angular separation at the satellite. Hence it could be feasible for ES A to communicate with either satellites A1 or A2 without causing harmful interference.
This can be modelled by an advanced “avoid constellation” method as shown in the figures below:
Original avoid constellation method:

Original avoid constellation method that also checks the satellite antenna boresight vectors:

In the second case the avoid constellation checks each non-GSO satellite in constellation A to see if it is within 10 degrees of a satellite from constellation B. If it is, then it also checks whether at the same time the angle from the satellite in constellation B has a beam or antenna that is pointing towards Earth station A. If not, then this satellite could be used.
When this second option is selected, then either satellite A1 or A2 could be used, as seen in the following figure:

This method could be used to check just the beam boresights. For example, it could be possible for ES A to not communicate with those satellites from constellation A that are within 10 degrees of the boresight vector of one of the system B ES group.
Consider the example below:
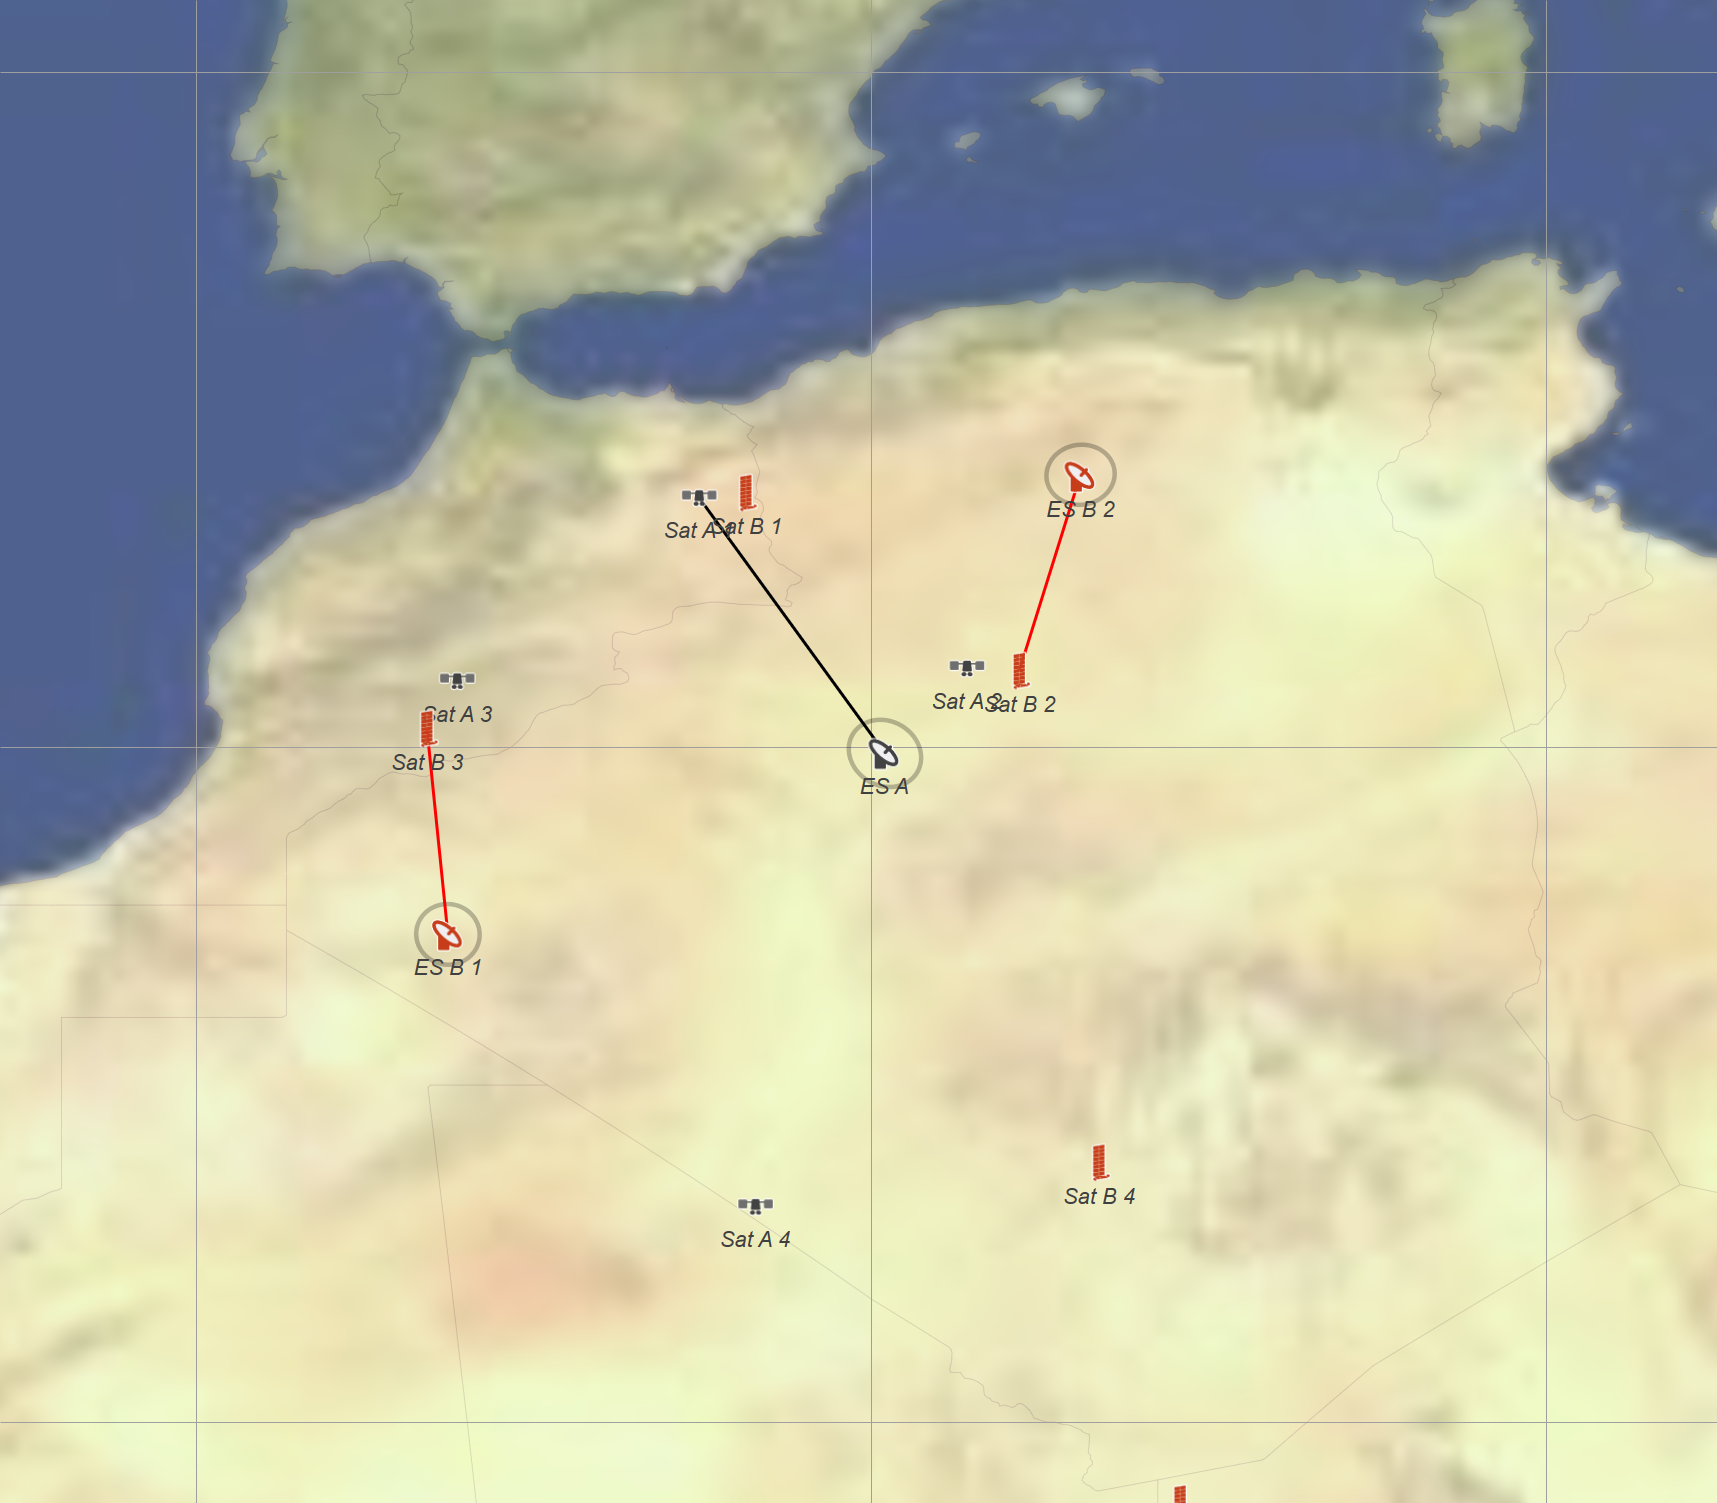
Here satellite A2 is close to satellite B2 that is being used by ES B2. Satellite A1 is close to satellite B1 and a usual “avoid constellation” tracking method would not accept it as an acceptable candidate. But in this case, it is acceptable as there are no system B ES that are pointing towards that location in the sky.
This option can be selected by something like the following:
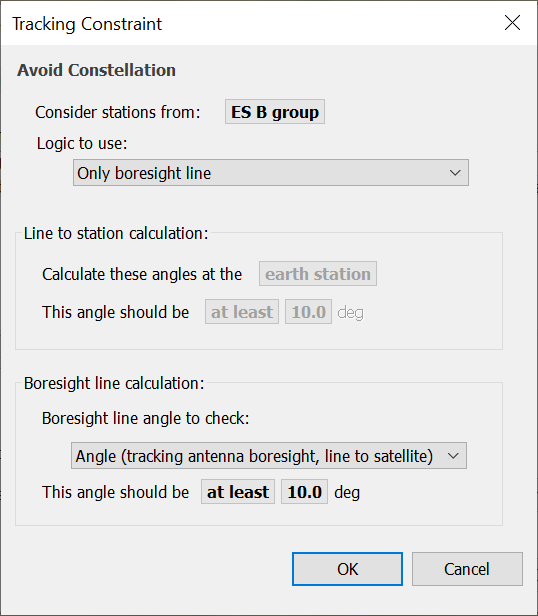
Hence with the combination of avoiding stations near other stations or near the boresight of active stations, it is possible to create a range of tracking strategies that can assist during coordination. This check can be done at either the antenna level or beam and checked at either the satellite or ES.
Select Longest Track Option
Some constellations try to reduce the number of handovers between satellites by using a “continue to track” method which selects a satellite that is heading towards an ES and then tracks it for as long as possible.
This can be done in a Tracking Strategy by:
-
Entering the relevant filters, such as minimum elevation angle and GSO exclusion zone
-
Selecting the “Longest hold time” in the Selection phase:

-
Enabling the “Continue to track” option with the same constraints as the filtering stage.
The continue to track options are available from the “Handover Options” button:
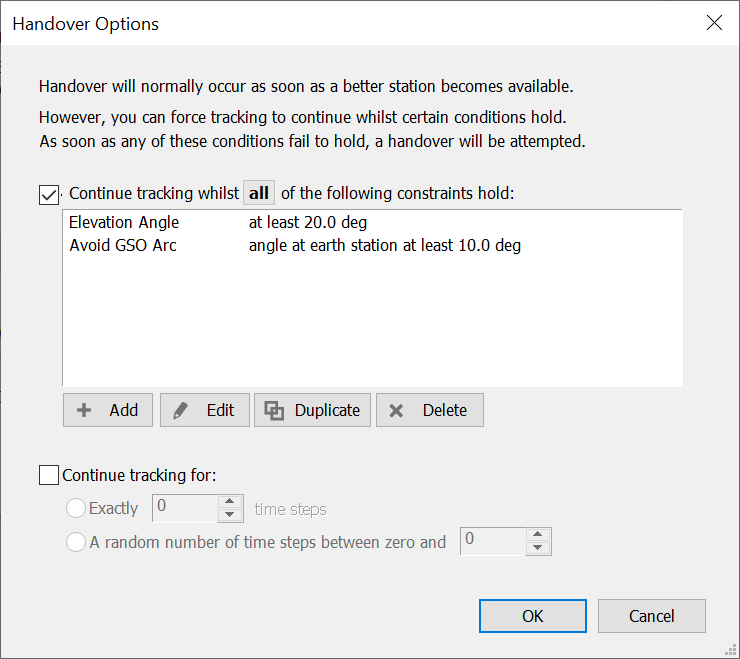
This additional “Continue to track” step is necessary to avoid a repeat of the {Filtering, Selection} stages at each time step which would lead to multiple handovers.
The result is a satellite selection method that limits the number of handovers and continues to track for as long as possible.
Note that in the Advanced Selection Method, the “Continue to track” method is described as the “r dot v” method. For more information, see Recommendation ITU-R S.1325.
Configuring a gateway with many antennas
A gateway can have multiple antennas, and the objective is for each antenna to track a different satellite to provide the best service. This could be done by having as many Tracking Strategies as Antennas, with the selection method:
- Antenna 1: Use a Tracking Strategy that selects the 1st highest elevation satellite
- Antenna 2: Use a Tracking Strategy that selects the 2nd highest elevation satellite
- Etc.
While this method would work, another, simpler, method is to ask that the Tracking Strategy excludes those satellites that are already being tracked by another Antenna at the ES. This can be done using the configuration below.
- The gateway Station is configured with multiple Antennas, each with pointing defined as “Allow the link to set the pointing”. This is needed so that the Tracking Strategy can work out which satellite is being tracked by each Antenna.
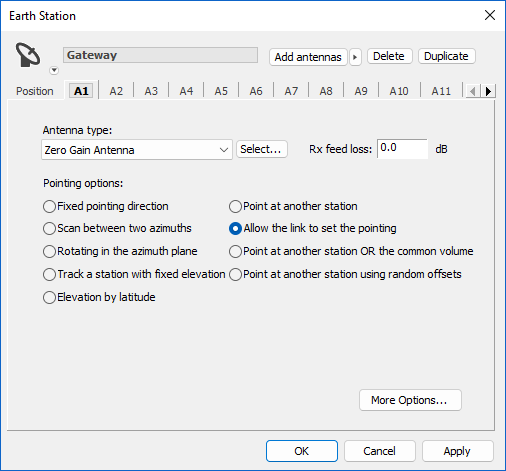
- Each Link then uses a different Antenna i.e. Link-N uses Antenna-N:
- All Links use the same Tracking Strategy:
- The Tracking Strategy uses the “Ignore stations that are already being tracked by another” option and then selecting the Antenna option (an alternative would be to track at the Beam level):
This method can be extended to include a minimum angle at the ES between active Links. This can be useful to avoid intra-system interference:
Model Inter-satellite Links
In the examples above, a Dynamic Link was used to connect an Earth Station (as the start of the Link) to a constellation of one or more non-GSO satellites (the end Station of the Link). However, a Tracking Strategy can be used in any situation, whether the start or end Station is a satellite or not. So, it could also be used by a satellite to select another satellite as part of an intersatellite link (ISL).
An example of this is shown below, taken from the Modelling AI 1.17 Newsletter
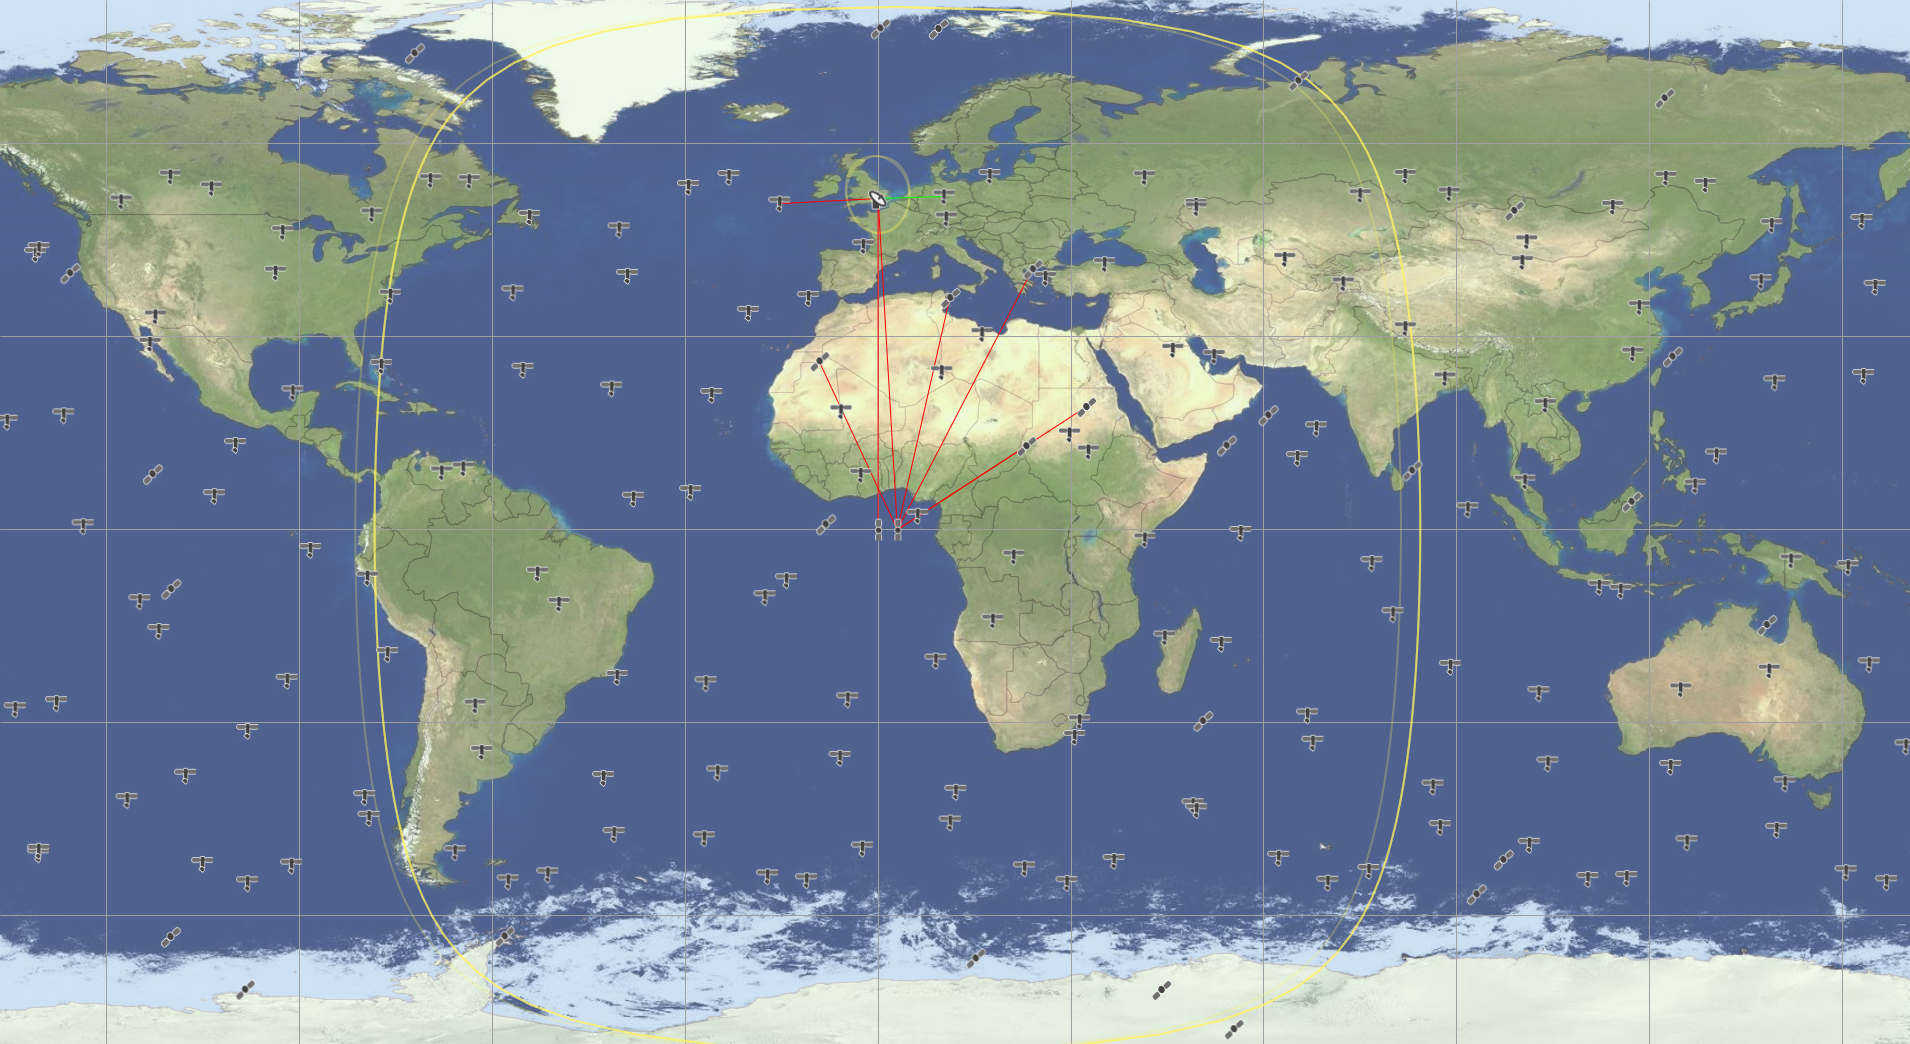
Here a Tracking Strategy is used by a GSO satellite to select the Earth Exploration Satellite Service (EESS) satellite to communicate with. This is done using the following configuration:
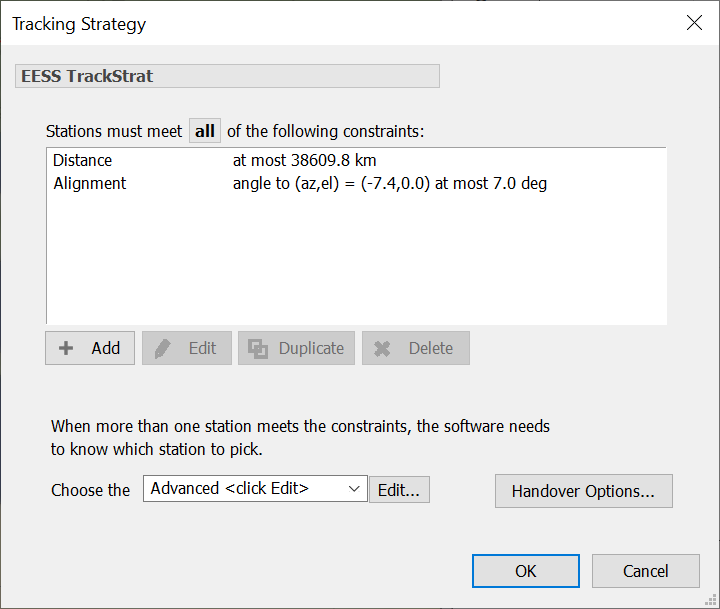
The distance factor is used to make sure the satellite is within the cone of coverage. For GSO systems, this geometry can be converted into a distance to the EESS satellite, D1, using the triangle below:

The second constraint is the alignment option. This is to select the satellite based upon the angle at the GSO satellite between:
- The line from the GSO satellite to the non-GSO satellite
- The line from the GSO satellite to a vector in direction (azimuth, elevation) = (-7.4, 0.0), which in this case is towards the UK.
The alignment constraint is then used in the selection phase, using the following:
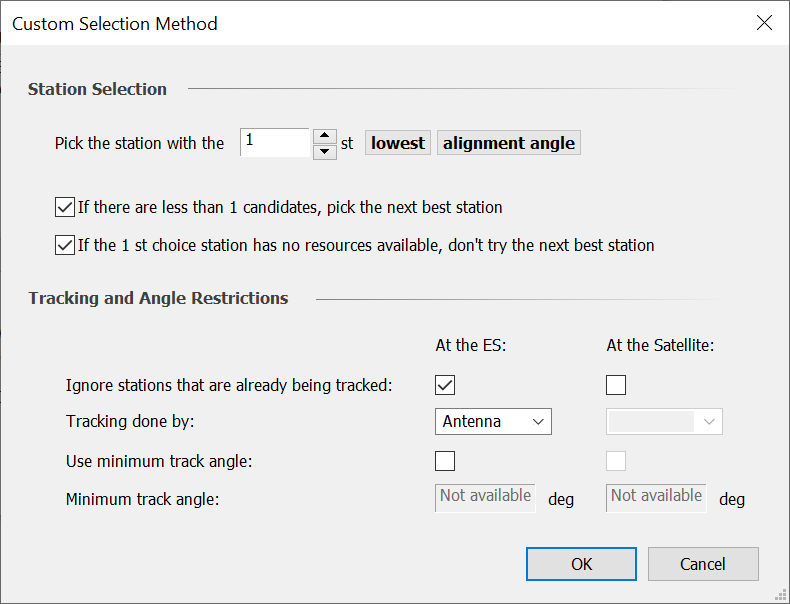
This selects the EESS satellite closest to the vector direction (azimuth, elevation) = (-7.4, 0.0) which is within the cone of coverage, i.e. the EESS satellite nearest the victim non-GSO system’s ES in the UK.
Derive Visibility Statistics
As well as being used for satellite selection in a Dynamic Link, the Tracking Strategy object can also be used to generate visibility statistics. The “If the 1st choice station has no resources available, don’t try the next best station” option can be used to return a list of candidate stations (as described above) and the number of stations on that list can be shown and used to generate statistics.
The Tracking Information object is contained with the Dynamic Link and can be shown on the Watch Windows like this:
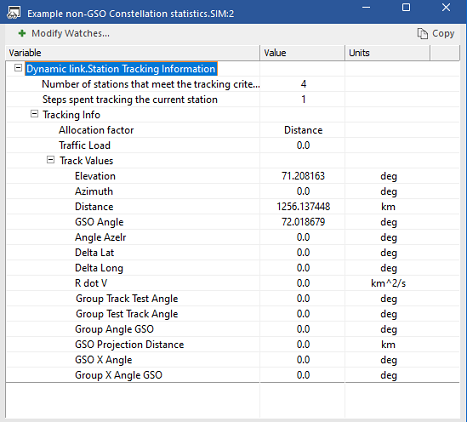
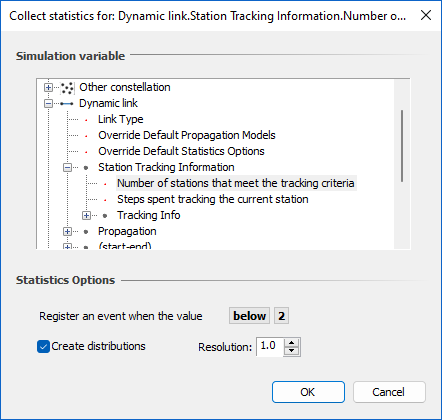
The “Number of stations that meeting the tracking criteria” can then be the variable used by a User Defined Statistics object, such as this:
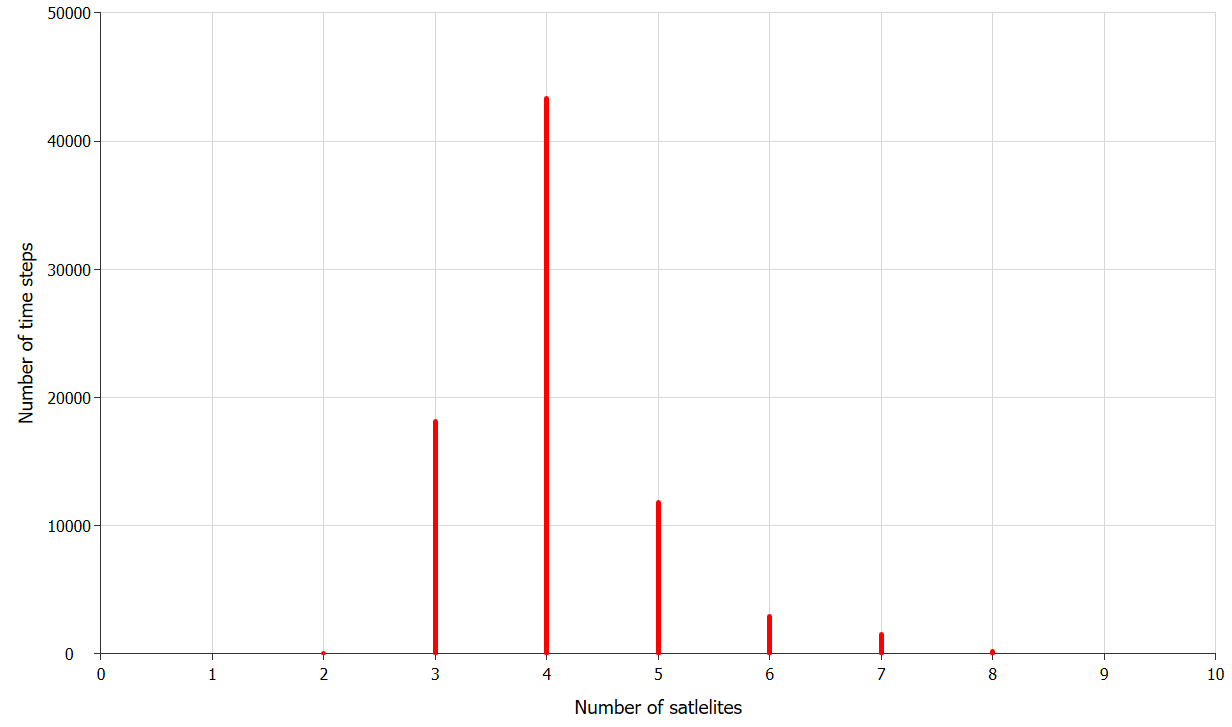
Then statistics can be generated for the number of satellites that meet the specified filtering constraints, in this case minimum elevation angle and GSO arc avoidance angle, as shown in the figure below:
Constellation Avoid with Diversity (New)
In some cases, if there is use of avoid pointing tracking strategies to protect another non-GSO constellation, it could be that no satellites are available at a specific time step. In this case, one way to maintain connectivity with a non-GSO constellation is to provide access via a second, backup, earth station that would have a different geometry.
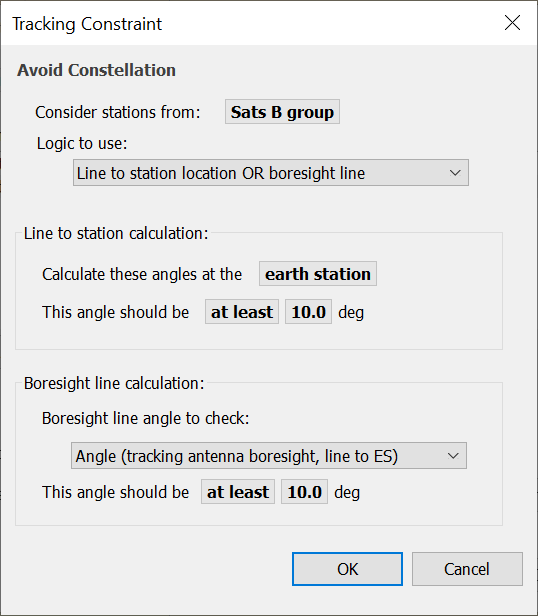
Consider the case where a satellite from system A can be used if one of the following is true:
- The satellite from system A is at least 10 away from any satellite of system B as seen by the system A ES
- The beams from the satellites of system B in item 1. above point at least 10 degrees away from the ES as seen by the satellite of system B.
This can be configured as follows:
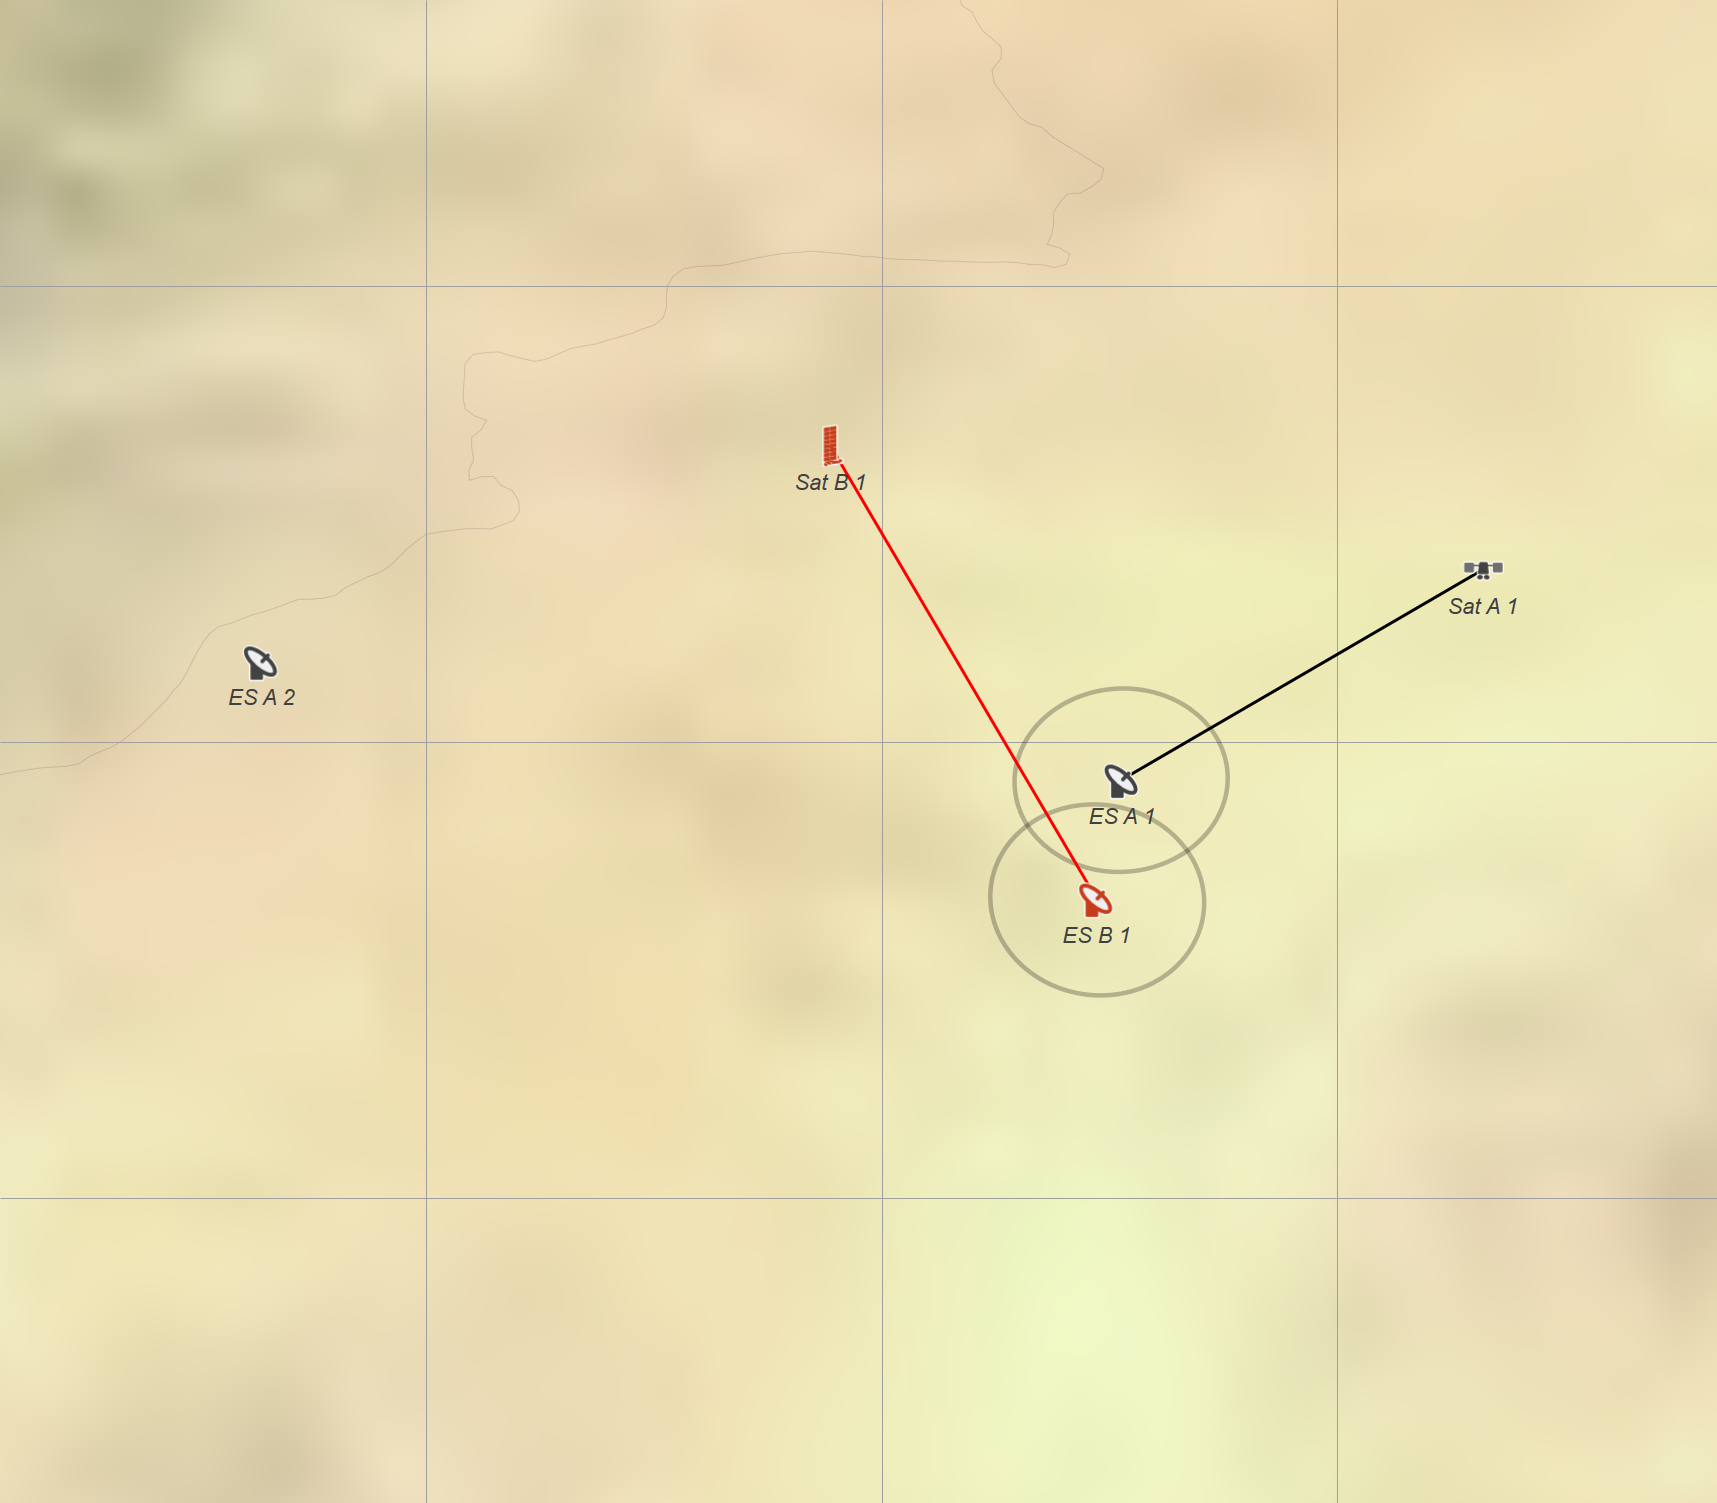
Examples of these two cases are shown below:
Here the ES are close together, but the satellites are separated:
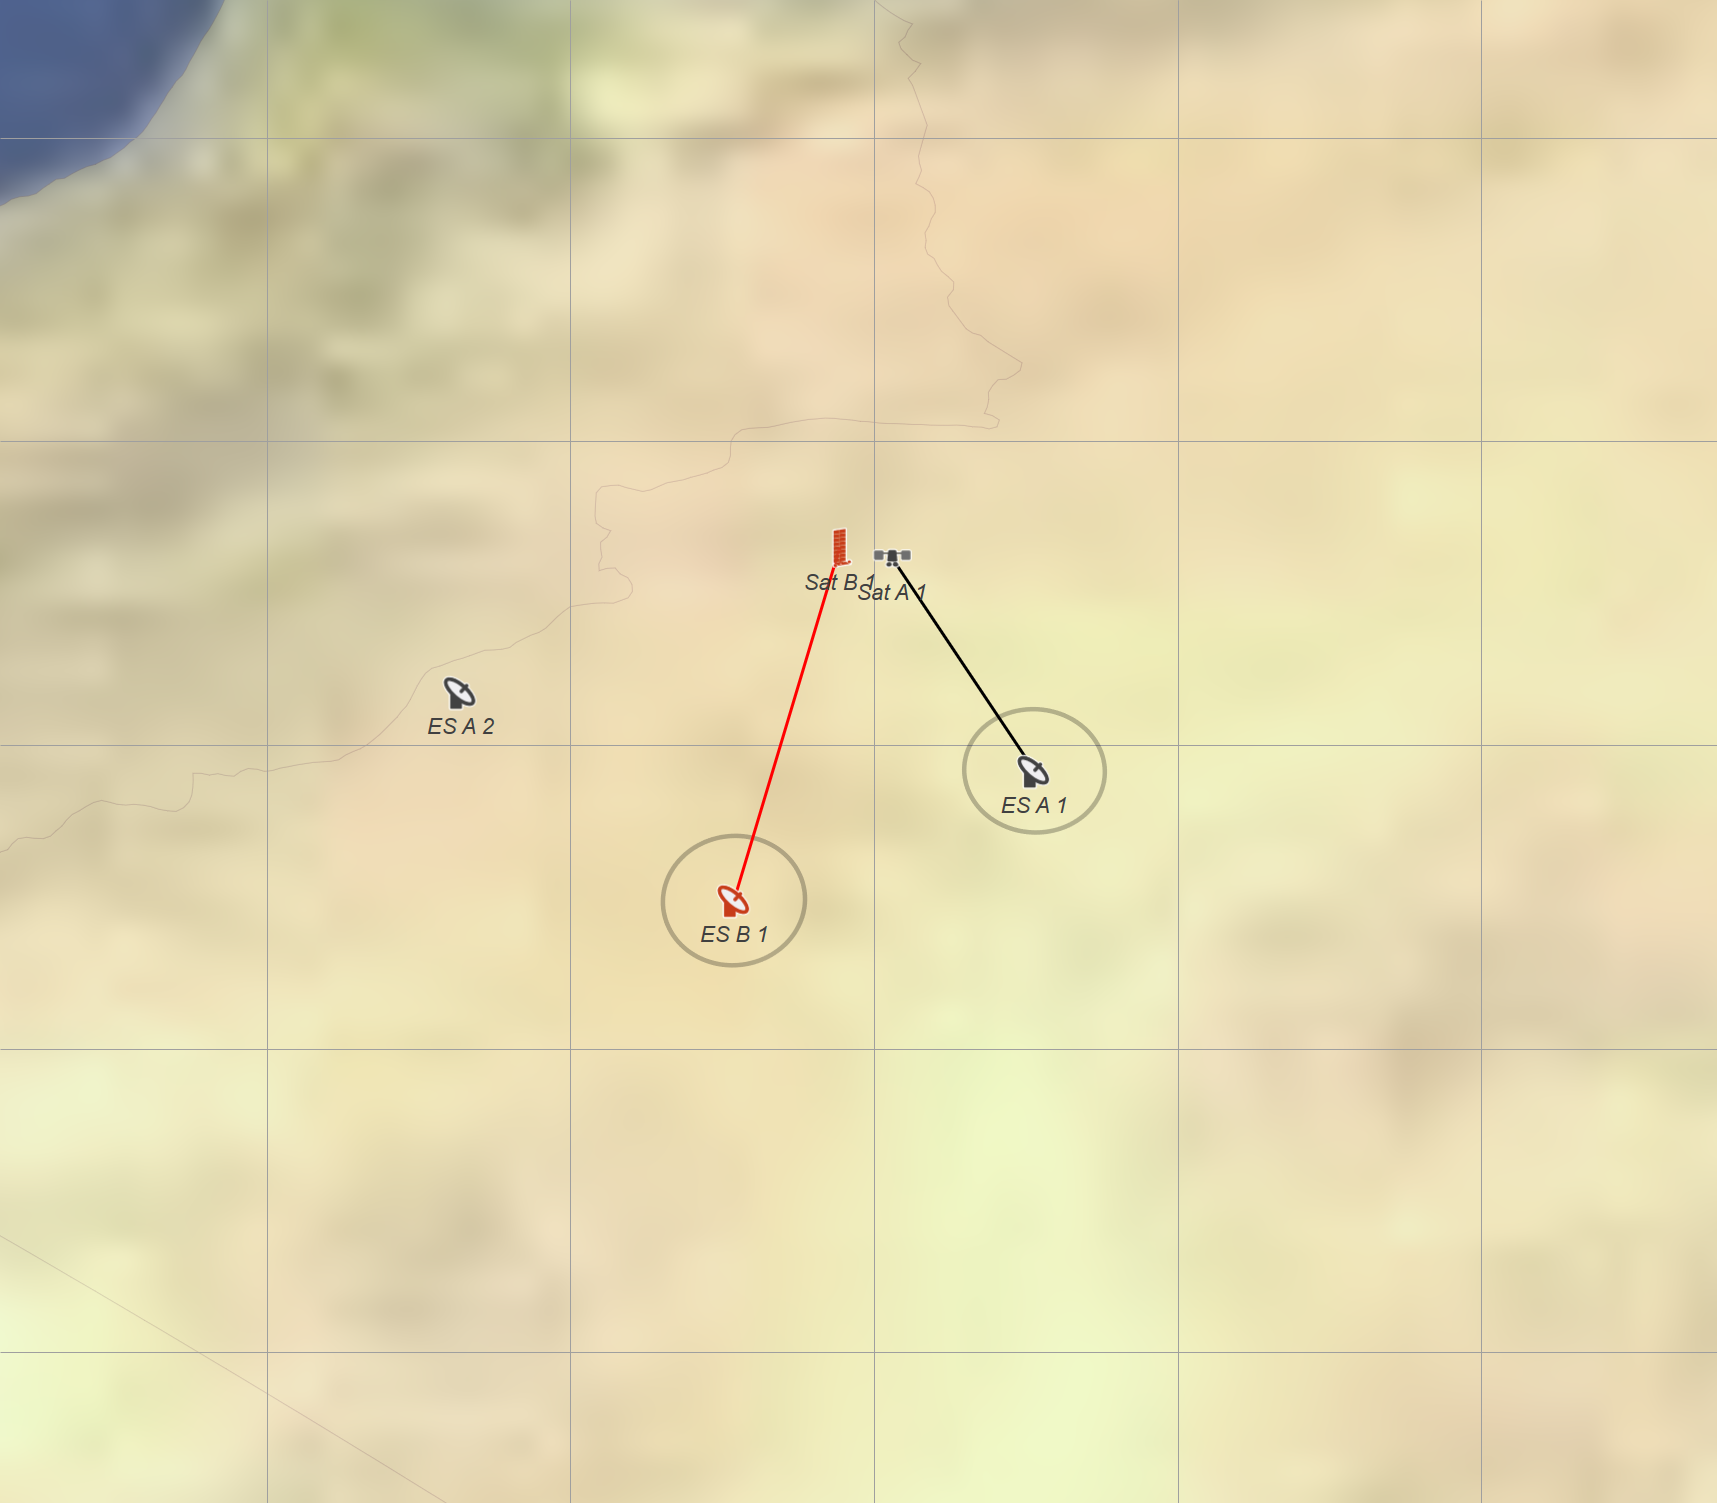
Here the satellites are close together, but the ES are separated:
In many cases, this would allow communication to continue. But if both the satellite and ES are co-located or nearly co-located at the same time, the link would fail. In this case a new option would allow a backup link to operate, as in the following figure:
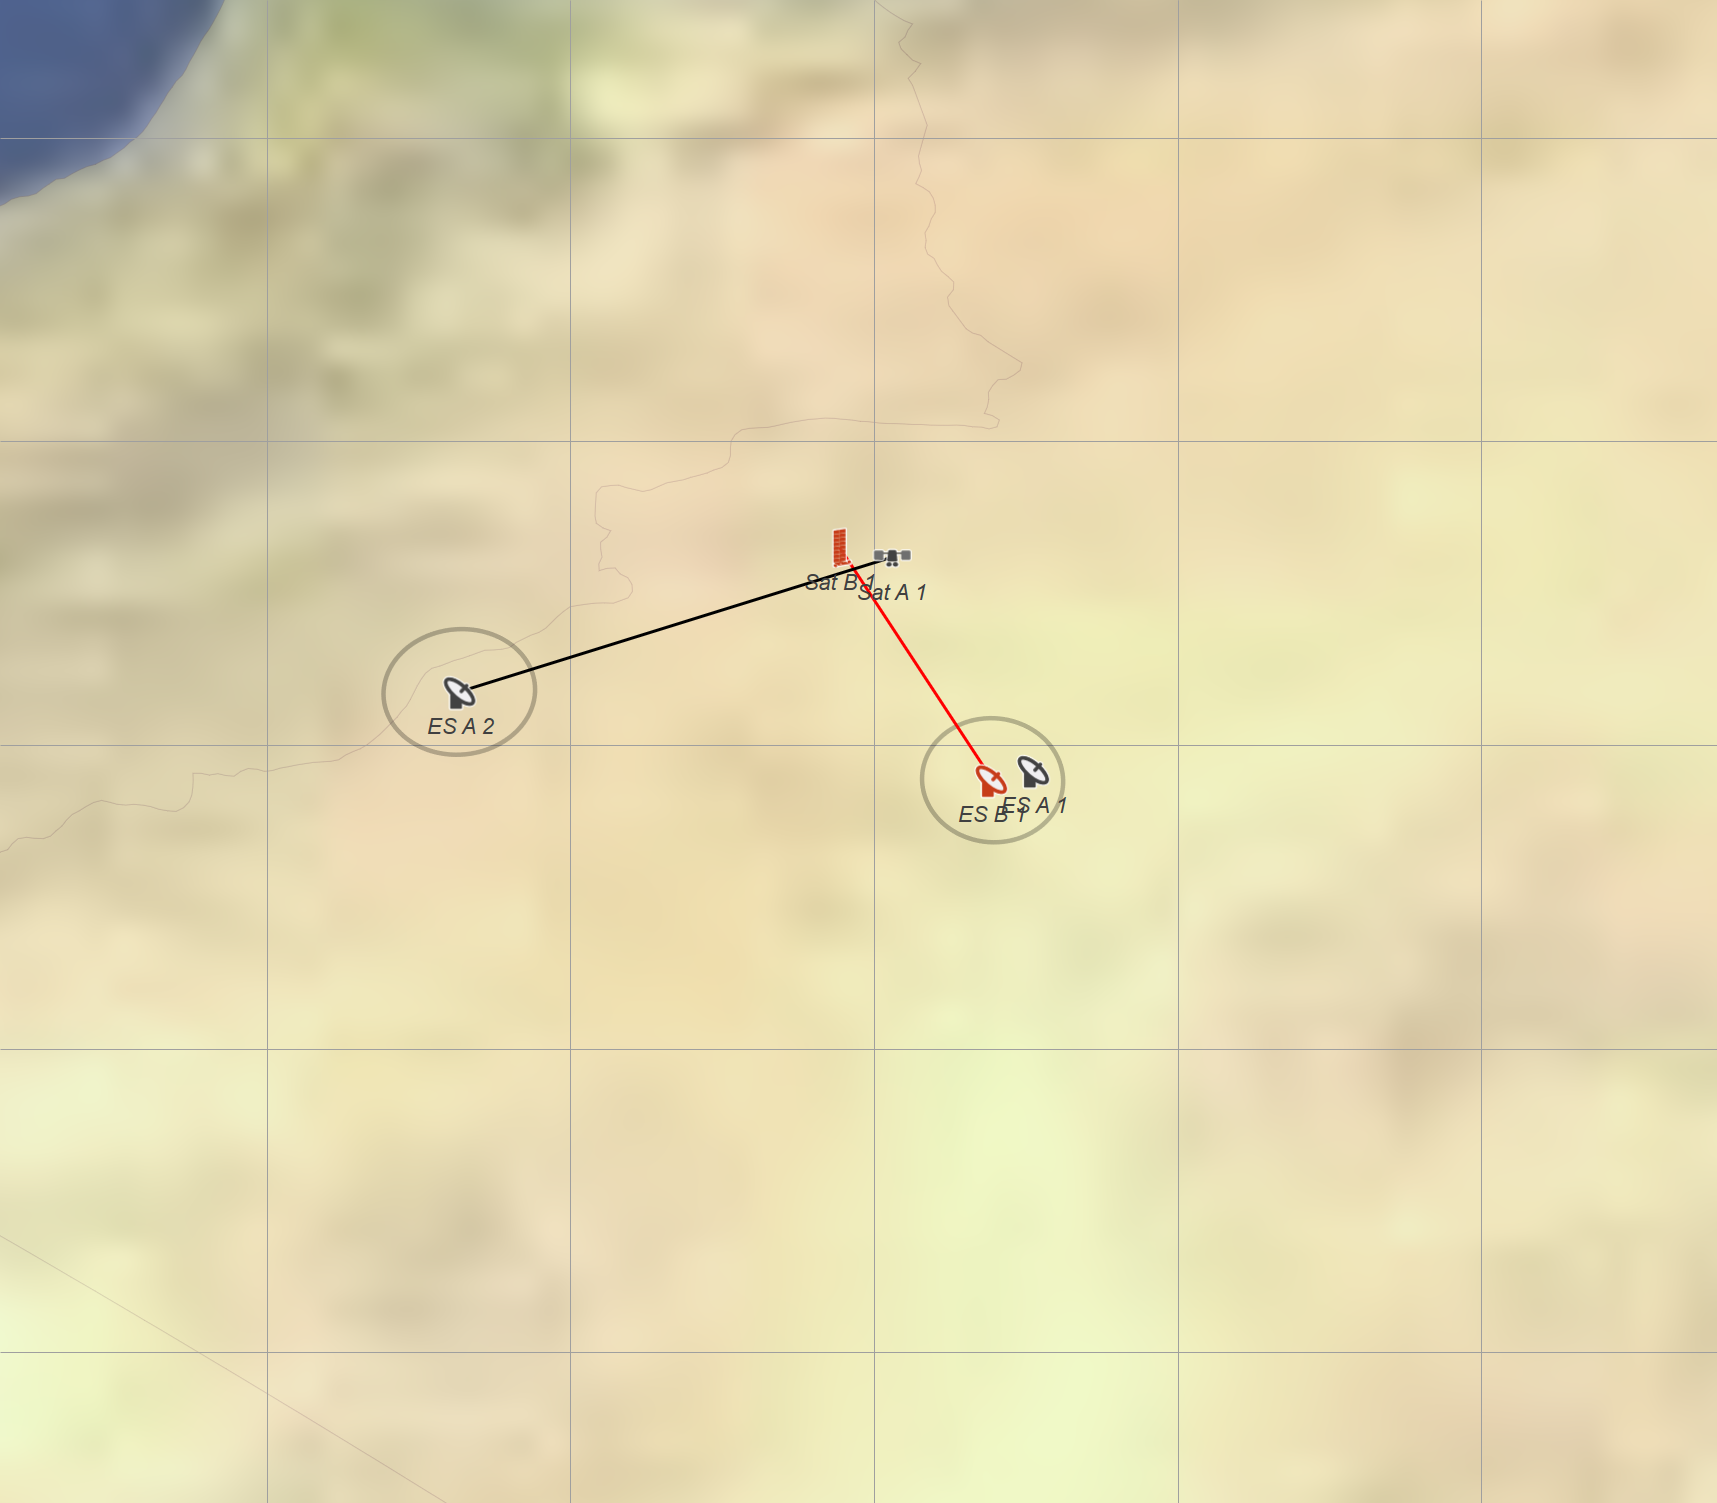
In Visualyse Professional, this is achieved by having two links, one for ES-A1 and another for ES-A2. Normally, having two links would mean that at most time steps there’d be two links active, and only one for the time step where both the satellite and ES are co-located or nearly co-located.
However, a new traffic object parameter allows it to be specified how many links can be active at each time step using that traffic object. Hence if both the ES-A1 and ES-A2 links use this traffic object with a maximum links = 1, as in the figure below, then only one will be active.
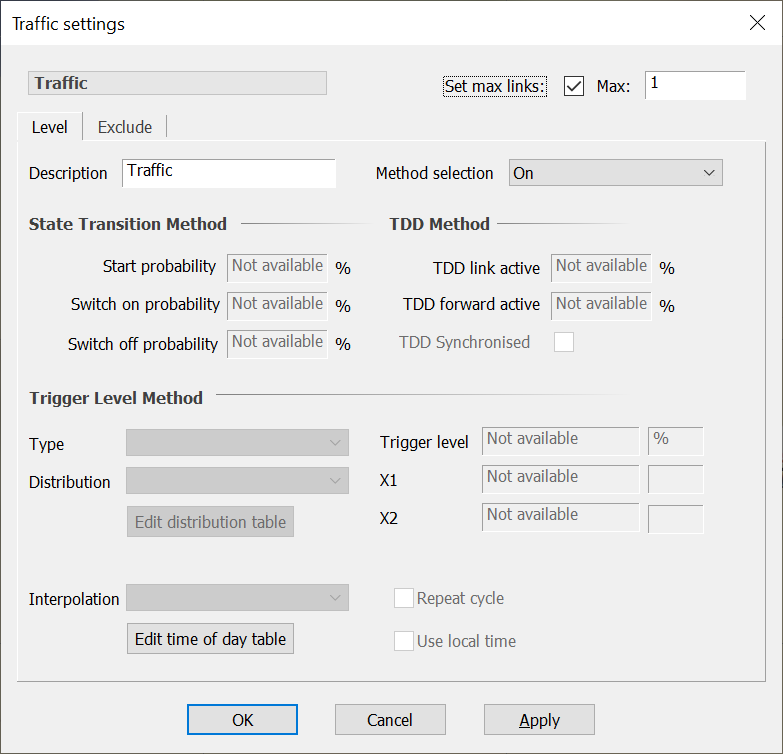
Note that the ES-A1 link should be higher up on the list of Links so that is checked first before the ES-A2 link.